06 November 2010

WIP finished!

I have had this quilt top sitting in on my shelf for almost a year.  There was something about it I just didn't like.  I recently showed it to my sister and she suggested I take off the outer border...PERFECT!  I absolutely LOVE it now!  I used my Pinwheel Parade pattern but made it bigger and used wonky pinwheels instead.  


And the back...Oh, the back!  I LOVE the back!  Cute enough to be the front.


The fabric is Wonderland by Momo for Moda.  Isn't it fabulous!  I just added it to my shop.

04 November 2010

Thing 1 & Thing 2

You always hope your kids pics go well, but you always know they wont go as planned...our Halloween pics demonstrate that...


As I was taking the pics I kept trying to get them to "just sit still."  Yeah right!  I think their costumes this year fit their personalities perfectly.  Two high energy, small bodied, blue haired people that follow only one rule--make as much trouble as possible.


Hope your Halloween was filled with mischievous blue-haired small people!

08 October 2010

temporary move

We are moving tomorrow from bunking with my sister to another temporary rental.

My dear aunt and uncle have had quite the delays with the construction of their new home.  Since we are moving into their old home as soon as it is available we are feeling the trickling effect of those delays.

Gratefully, my fam has been generous in allowing us to stay with them.

However, we are all ready to have our own space again.

My dad has a rental that opened the other day so we will be moving in there tomorrow until our permanent home becomes available...whenever that might be.

This has been quite the moving experience!

We still have smiles on our faces, a roof over our heads, food on our table and each other to enjoy.  We are blessed!

21 September 2010

I love having two!

This is what I found when I looked outside as I was canning peaches the other day...


They are getting so big!

15 September 2010

how to: sandwich your quilt layers

1.  Lay your quilt back face-down on a clean hard surface.  Tape around the edges with masking/painting tape.


2.  Add your batting.  Smooth it out.  Depending on the quality of batting you are using your may or may not need to tape it down also.


3.  Top with your quilt face-up.  Make sure the back and batting are 2-4" wider than the quilt top on each side.  Smooth it out.


Here is a look at the back and batting wider than the top.


4.  Pin, lots!  Your batting package may indicate how often it should be pinned.  It is generally every 4-8".  If you need to cut off excess back or batting be sure to keep them 2-4" wider than the quilt top.  Your layers may shift slightly during quilting and this will save you from having your beautifully pieced top hanging over the back.

There you have it!  Quick and easy.

13 September 2010

Here it is!


I had a blue stripe for the binding, but as I was getting ready to stitch it on I just couldn't do it.  It wasn't right.  My sis agreed.  I ordered this orange and couldn't be happier with the results!


I'm thinking I need one for myself my baby.  I LOVE the randomness of it!  It's got the quilt and the pattern over in my shop right now.

30 August 2010

I FOUND IT!!!

The cord thing was only five feet away in my husbands computer bag the whole time.  Go figure.  :)  So happy to have it.  I don't have a pic of the quilt yet but here is a pic I took of the fabric before I put it together.  I absolutely LOVE the final product.  I'll show you soon.


When I pulled the pics off my camera I found some from our travels during the move...


HOME!
(please ignore the dirty window)

27 August 2010

We're Here!

So... we have been here for a couple weeks.  We are currently bunking in with my sis and her fam.  (Thank You, Sis!) 

We are waiting now to move into our new-to-us home.  I keep dreaming of all the decorating I will be doing.  I've got some fun ideas, but there just gonna have to wait.

Before today I had not done any sewing since the move.  I know, Crazy!  These last few days I have really been itching to pull Berni out of the closet and sew something fabulous together.  I finally did it!  I finished a quilt top I had started a while back.  I can't wait to show you all.  Actually, I would post a pic now, but I can't find my camera cord.  Go figure.  As soon as I find it you will be the first to know!

Funny story...

My son, E was hanging out with me as I was sewing.  I was cutting off small excess triangle pieces I didn't need.  As he was playing with them he realized if he sewed two together at the points it would look like a butterfly.  So we made a butterfly.  He gifted it to me.  Such a sweet boy.

A while later he decided he wanted to ungift it and sell it for $200.  A few minutes later I noticed him walking out toward the road.  We currently live on a very quiet country road.  Probably don't get more than 20 cars pass in a day.  But close by is a much busier road.  I asked him what he was doing and he said, "I'm trying to figure out how to get those cars to come over here to buy this butterfly."  (Insert chuckle)

Me:  Come over here and we will talk about it.

... (indicates time passing as he walks slowly with his head hanging down past his shoulders)

Me:  Come sit on my lap.  (I proceed to kindly explain to him that all things have a value and that some things are most valuable as gifts to grandmas/aunties/moms...his being one of them)

E:  But I really want to sell it...for $200!

Me:  Well, maybe you can give it to your auntie as a gift.

E:  Maybe I can give it to her as a gift and have her pay me $10!

Me:  Maybe you can ask her if she will buy if for a nickle.  That is FIVE PENNIES!  (expressed with extra enthusiasm)  Actually, you should ask her if she will buy it for a quarter and if she says no you should ask her how much she will buy it for.

E:  (as he leaps off my lap and runs into the house to ask his auntie)  I will ask her to pay me $1 for it!

...  (a short laps as he runs full speed)

E:  Auntie, will you buy this from me for $1?

Auntie:  (since rejecting his offer of $200, she sweetly replies)  Sure.  Of  course I will buy it for $1.

(E looks over at me in complete amazement.)

Auntie:  Do you take change?

E:  ... (silence)

Auntie:  Orrr...maybe not. :)  I'll get you a dollar bill.

E:  (running back to me)  Mom, she bought it!  FOR $1!  Lets make some more so I can sell more.  Mom, will buy one from me for $1?

Me:  Kiddo, this is my fabric.

E:  So...will you buy one from me for $1?

Can't blame a kid for trying.


It's good to be back!
~kersten

12 August 2010

...Another Door Opens.


When did we collect 26' x 7 1/2' x 8' of stuff?  Good thing I had a garage sale last week (and for Mikes mad 3D packing skills) , we never would have been able to fit everything otherwise.

Thanks to all the church members who helped us load and a HUGE thanks to B for dinner, hanging out with my kids all night and hers (while having her own baby strapped to her back) and for vacuuming my living room.  Bless your heart!  You inspire me to be better.  I'm sure gonna miss you.

I had a good poor me I am moving cry yesterday.  I needed it.  I feel much better now.  I'm gonna miss this wonderful place and many amazing friends and family but I'm very excited for our future!

We are off tomorrow.  I'm about as excited as a six year-old on Christmas Eve.  Can't wait.

Until next time...

08 August 2010

When One Door Closes...


We said goodbye tonight to a lot of people we love.

It was hard.

This little farming community has become home for our young family.  We will miss it here.

Grandma planned a party and grandpa smoked some delicious beef.

There were lots of loved ones...

and plenty of messy baby faces.

It was perfect.  We love you all and look forward to seeing you again!

BTW - B, I loved your jeans.

05 August 2010

Ironing Board Cover Tutorial


I recently made a ironing board cover for a friend.  I loved how easy it was and thought it would make a great tutorial for a quick and easy project.  The best thing is you can easily customize these directions to any size of ironing board!


This is what you will need:
Cotton Fabric
Cord (I used #2 Polyester Cord--for window coverings)
Cord Stop (just one)
safety pin
Basic sewing supplies


To determine the amount of fabric you will need measure the length of your ironing board and add 13.  My board is 54".

54+13=  67"

Of those extra 13 inches, eight will be for wrapping around the board and the other five are for shrinkage/fraying that will occur when laundered (wash/dry before you begin). 

Because I wanted to use more of this fabric for future projects I just got 2 yards (72").


Lets get started...

 Lay your fabric right side down on the ground.  Put your ironing board on top of it.  Mark 4" around the board with dots.  Play a little game of connect the dots to get the line you will cut along.  If you decide you want the cover to wrap around your board less, that is completely up to you.  I would just suggest not cutting the fabric any less than 3" wider than the board.

If you have a serger you can use it instead of cutting with scissors.  This will eliminate the need to double fold when sewing. 


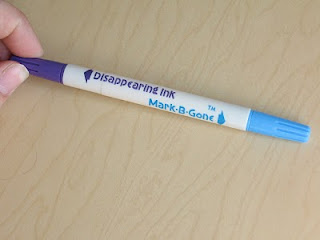
I really like this fabric marker!


Now cut it out.  You will need to replace your current ironing board cover and pad for this project.
(you might notice my board is missing its legs.  my son used it as a pretend surf board one day.  he was fine, but it didn't end too well for the board.)


Fold the edge of your fabric 1/4".  Press with your iron.  Determine where the center top is of your fabric.  This is where you will thread the cord though.  You only need to leave about 1" for the opening so stitch this 1/4" fold down about 3-4" in the top center.  Backstitch at both ends.  This will reinforce this area and keep it from fraying later.


If you have an overlock stitch (#3 and #8 are two types of overlock stitches) on your machine, you can sew around the edge of your fabric using that stitch instead of turning it under 1/4".


Now fold it under 3/4" and pin (make sure it is wide enough for your safety pin to go through).  You wont need to pin as frequently on the straight sides as you do on the curves.  Press it if you like or just remove the pins when you get to each one (be careful not to break any pins or your needle).


See how I have two pins next to each other under my presser foot and than two pins next to each other behind the presser foot?  I did that so I remembered to leave an opening for the the cord.  DONT stitch between the two sets.  Use a straight stitch as you sew around the board cover.  Stitch along the fold or along the inside of the serged/overlock stitch.  Backstitch at the beginning and end.  
FYI, the curved areas of your fabric will pleat a little when stitched in place.  It will not lay completely flat when turned under.  


To determine the amount of cord you need, measure around the edge of your cover and add 15.  My cover measured 145".

145+15=  160"

Thread your cord onto a safety pin.  Insert it into the area you left unstitched at the top of the cover and thread it through.  Thread cord ends through your cord stop.  Secure your cord ends so they don't fray.


Put it on your board and enjoy!


Something about these silly birds makes me happy.  The word 'frou-frou' comes to mind.  Sounds like something my dad would say.


Those of you with mini boards...  Depending on the length of your board and the width of your fabric, you might be able to use the width of fabric to run along the length of your board.  

i.e.  If your board is 30" long and the width of your fabric is at least 42", this can work.  Just keep in mind that the direction of the design on the fabric will run the width of the board, not the length.  If the width of your board is 12" you can probably get by with only 2/3 yard.

03 August 2010

Why I have been MIA...

My little family is moving...next week.  I can't believe it is almost here.  We originally thought of moving next summer, but things turned out so we could make the move this August.  And really, once you decide to move, the waiting is the hardest part.

My older boys have enjoyed one more summer here spending time with their grandparents--swimming, going to an air show, getting farm parts and lunches with grandpa, helping grandma with yard work, having sleepovers--doing the things they love to do.  Thank you grandma and grandpa!

These last couple weeks have found me deep into packing.  I have found the word "packing" doesn't just mean putting things into boxes.  It is sorting, trashing, selling, donating, cleaning and organizing.  The biggest move we have made since having kids (kids=lots more "stuff") was about 15 miles.  Next week we will be going 600+ miles.  We now have even more "stuff" than we did when we made that short 15 mile move.

Why is it that once you start packing, your house seems to be so messy?  Oh well only a few days left.

Any suggestions from you more experienced movers out there?

Yes, even in the middle of all this "packing" I find time to sew.  Not much, only a few minutes in the evening after my kids are in bed.  I need it, actually.  It is a major stress reliever for me.  I wanted to come up with something quick and easy that I can share with you all before the big move.

Come back Thursday and ironing might just become your newest favorite chore...maybe.

27 July 2010

SALE!

--SALE HAS ENDED--

Just in case you haven't been over to my Etsy Shop recently, I am have a Christmas In July SALE going on right now.  All products have been marked down 20%!  These are the lowest my prices have ever been.  This SALE continues until the end of the month.  Just 3 MORE DAYS!

I have patterns...


a quilt...


Plus, I offer a coupon with every purchase!  Don't miss it, only 3 MORE DAYS!


24 July 2010

After - Vintage Cosco High Chair

Remember this awful before picture of the lovely vintage Cosco high chair?  Peeling paint, rust, burn mark on the seat.  It really needed some love.


Here is the after...


Stripped, sanded, repainted and reupholstered.  I love this Amy Butler fabric!  I added vinyl for easy cleaning.


The only thing to improve this high chair is an adorable little person...


I might need to attach a securing strap...


Like I said before, this is a family heirloom.  My mother and her sisters sat it in, my sisters and I sat in it and now I have it for my children.  I imagine it is sturdy enough for my grandchildren to sit in someday.

Hope you love it as much as I do!