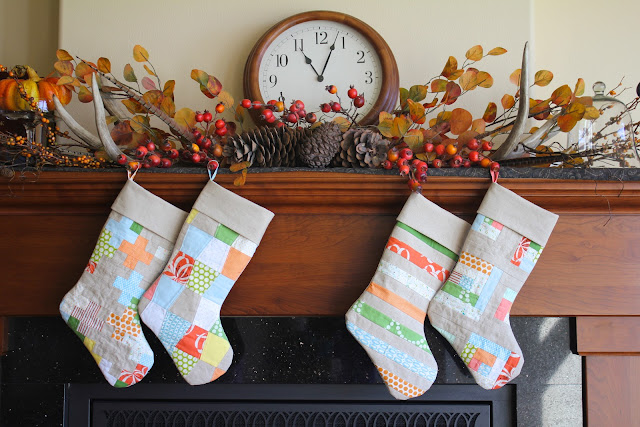
This tutorial does not include a stocking pattern. I just used a cheap dollar store stocking I have had for several years. Do that, or free-hand it...if your that good. :)
Just be sure that if you do trace around an existing stocking you add a 1/4" all the way around it (for seam allowances) to achieve the same size.
I also don't include directions for make the pieced design (front) of the stockings. I just decided on four designs (plus, dresden, log cabin, stripes) I wanted and made a block of each. For the size of my stockings I needed a 12" x 15" pieced block to work with.
You will need:
- an "old stocking" to use as a pattern
- a pieced block large enough to cut a stocking from (the front of the stocking)
- a back side of the stocking (traced and cut from your old stocking)
- two inside lining pieces (also cut from your old stocking)
- a strip of fabric approximately 6 1/2" x 14 1/2" for the cuff (sizes will vary depending on the size of your stocking... more explanation later)
- a scrap (approx 2" x 6" for the hook)
- batting or fusible pellon (for the front of your stocking and for inside the cuff)
- basic sewing supplies
To get started...
Make sure the front and back of your stocking "face" in opposite directions. You will also need to do this for your two lining pieces.

As you see in this picture above, I stitched a strip of fabric to the top of my pieced block to complete the length of my stocking. I did this only because I didn't want to use up these fabric I love just to have them covered by a cuff in the end. This added strip is smaller than the cuff, which will overlap my printed fabrics by about 1/2".
Once you get your stocking front cut out, you will need to attach the pellon. Be sure you are cutting it so the bumpy side of the pellon will be facing the back of your stocking front. Follow your pellon instructions.
If using batting instead, cut a piece of batting a little larger then your stocking. Baste and quilt if desired.
I chose to use pellon instead of batting because it offers stability without the bulk.
Once your stocking front is quilted and ready, stitch it (right sides together) with the back piece. Be sure to back stitch and use a 1/4" seam allowance. Stitch down around the heel and toe and end back at the top. DO NOT stitch across the top! This will be the outside or "main stocking".
Stitch the lining pieces together in the same way. You may want to use just a hair more than a 1/4" seam allowance. This will help the lining to fit snugly inside the main stocking without being too bulky.
Snip around the curves of your main stocking after stitching. This will help the curve to sit more neatly once it has been turned right-side out. Do not cut through the stitches!
Go ahead and turn the main stocking right-side out now. Push out the heel and toe with your fingers.
Keep the lining in-side out. Slide it into the main stocking with your hand and work the heel and toe so the seams match.
Use your scrap piece of fabric and this tutorial to make your double-folded hook. Stitch along the long open side and fold in half. Pin it inside the stocking lining, as shown below, just to the side of the seam on the heel side of the stocking. Make sure the raw edges are facing out of the stocking!
Now, for the cuff.
Measure the width of the stocking opening. Double that number. Add 1/2".
To get a 3" cuff you will need it to be 6 1/2".
So, the piece I cut for my cuff was 14 1/2" x 6 1/2".
Press it lengthwise like this.
Your pellon needs to be 3" wide and 1/2" shorter than the length of your cuff fabric.
I cut mine 3" x 14".
Insert your pellon. Place the bumpy side down against the cuff fabric and press. Be sure to keep the entire piece of pellon/batting to one side of the fold. Center it 1/4" away from the other three sides.
Stitch the short ends, right sides together. Press your seam open.
If using batting you need a piece that is 3" by the full length of your cuff. When stitching the short ends of your cuff together, the batting will be stitched in with it also. You can then cut out the excess batting off the seam allowance to help reduce bulk. Just be sure not to cut the seam.
Fold it over along the fold (that runs the length of your cuff) so the batting/pellon is inside the cuff.
Tuck it inside the stocking lining. Line up the cuff seam with the stocking seam along the heel side. Raw edges of the cuff should line up with the raw edges of the main stocking and lining. The hook should be pinned between the lining and the cuff. Pin the cuff several times if needed.
Stitch all the way around. Be sure to back stitch at the beginning and end. I also put a little back stitch over the hook for added durability.
Pull the cuff out of the stocking and fold over the stocking. The hook should be on the outside of the stocking... READY TO HANG!!


